CHOCOLATE BLACKBERRY BREAD

Some foods are just indisputably meant to be together, like peanut butter and jelly, like biscuits and gravy, like sweet corn and basil. But chocolate and blackberry? I never knew it before, but they're one of those classic combinations. Chocolate and blackberry are

married

, y'all.

There something magical about the combination of the deeply flavored, sweet berries playing against the tart, floral notes in intensely dark chocolate. I've made a thousand chocolate cakes before this one, and yet somehow there I was, combining these flavors for the first time. Swirling fresh blackberries into chocolate cake batter allows the two to combine and become something

more

than either flavor once baked, for lack of a better descriptive word. Just

more

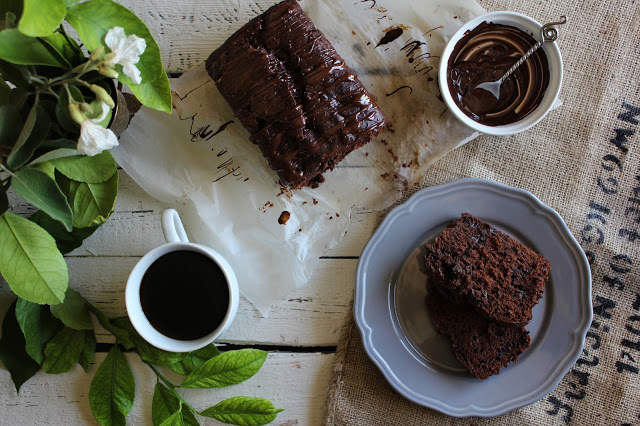
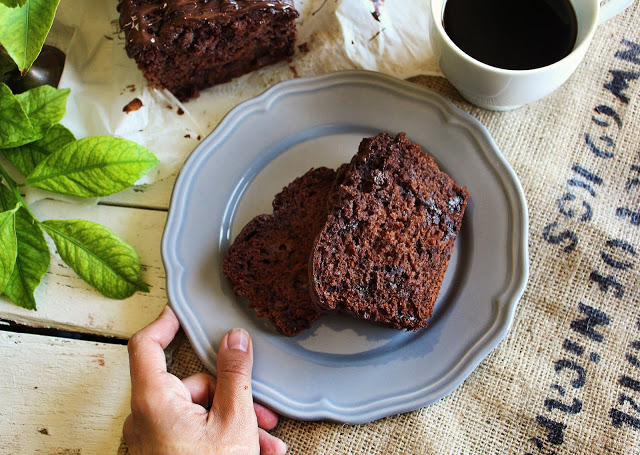
. More like the ripe taste of late summer on your tongue. More chocolatey, somehow. More grownup, maybe, although it's one of those 'sophisticated' tastes that I suspect everyone will actually love. Tossing some whole berries into the batter as well allows for surprising little pockets of fruit that pop up in each bite, silky and jamlike and addictive. The whole thing is a wonder, really. I was lucky enough to make it just before blackberry season ended for the summer, and while I'm sure fresh is best, I have a suspicion that you could make this with frozen berries all winter long and bliss out on chocolate blackberry perfection just fine.

There's been a lot of extra love floating around in my world the last few months, a record-setting number of engagements and milestones and generally wonderful things. So why not chocolate and blackberries, after all? In a few hours from now, I'll be jumping on a plane to the opposite coast to watch two dear friends marry each other, and I couldn't be more excited--or more convinced that this cake is the perfect metaphor for all things matrimonial. Two main ingredients that compliment one another, each sharpening the flavor of the other as they join to become something greater in the pan than they were in the bowl? Sounds about right to me. Here's to love! Here's to perfect matches! And here's to chocolate's perfect match, the blackberry. Now, let's have some cake*.

[ *Yes, I know, I keep referring to this as a

cake

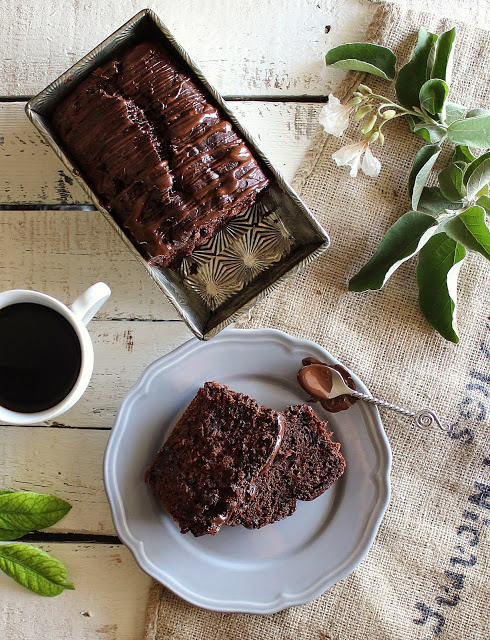
when it's clearly titled Chocolate Blackberry Bread in the recipe. But come on. We all know this is a 'bread' in the same way that zucchini bread is a bread....which is to say that it isn't at all. Mazel tov, have a slice of cake already! ]

Chocolate Blackberry Bread

Makes one 9" x 4" loaf

small amount of butter or coconut oil for pan

1 1/2 cups all-purpose flour

1 cup granulated sugar

1/2 cup cocoa powder

1 teaspoon baking soda

1/2 teaspoon salt

1/3 cup coconut oil

3/4 cup Greek yogurt

1/2 cup milk

6 oz fresh blackberries

4 ounces dark chocolate

Preheat oven to 350, and lightly butter or apply oil to the sides of a 9" x 4" loaf pan. In a large mixing bowl, sift together flour, sugar, cocoa powder, baking powder and salt. In a separate bowl, combine coconut oil, yogurt and milk. Take half of the blackberries and puree in a food processor (you can also just smush them up a bit with a fork, if you prefer a more rustic texture or if you don't happen to have a food processor), add pureed blackberries to liquid mixture. Make a well in the center of the dry mixture and pour liquid into it, mixing as you go until it combines into a thick batter.

Separate the chocolate into two piles and chop half of it into small pieces (about the size of chocolate chips). Fold remaining whole blackberries and chopped chocolate into batter, then pour into pan and place in oven. Bake for at least 65 minutes, testing with a knife or skewer after an hour (you may need a little longer depending on your oven; mine needed about 75 minutes). Bread is done when a knife can be inserted and removed cleanly. Take out of oven and let cool.

Melt remaining chocolate in a small, microwave-safe bowl, stirring until smooth. Drizzle over room temperature Chocolate Blackberry Bread, then serve.

STRAWBERRY FEELS FOREVER


Two magical little words for you today, my friends.......strawberry season.

Just saying the words gives me a little strawberry-perfumed sigh of satisfaction. These plump, juicy little red mouthfuls are a favorite of mine from way back in childhood, and always conjure up a series of lazy summertime afternoon feelings. When challenged to come up with a dessert that matched perfectly with a Fourth of July-themed picnic, my first and only thought was STRAWBERRIES. Seeing as July fourth falls smack in the middle of their ripe season, it's perfect timing, and I think you'll love the simplicity of this rustic tart. A shortbread cookie-inspired, press-in crust is the easiest pastry base in the world to make, and the buttery pastry meets its perfect match when topped with a thin layer of rich mascarpone and thinly sliced sweet-tart berries.


The little hints of white that peek through the layers of cheery, bright red strawberry are subtly patriotic enough for any July fourth picnic, and if you're looking for a flag-inspired dessert that gets its lovely hues from nature (rather than vats of red--and worse, blue--dye), this is the treat for you. Happy Fourth of July!


Strawberry Mascarpone Tart

Makes one 9" tart

For the tart base:

4 tablespoons unsalted butter, softened
3 tablespoons sugar
1 large egg yolk
1 cup flour
1 teaspoon salt

For the tart topping:

1 cup mascarpone
1 tablespoon lemon zest
1 tablespoon fresh lemon juice
1/3 cup sugar
1 1/2 cups sliced strawberries
2 tablespoons honey

Preheat oven to 375 degrees. Stir together butter and sugar in a medium bowl, then stir in egg yolk. Add flour and salt, and stir until the mixture is dry and crumbly. Press dough into bottom and up the sides of a 9-inch tart pan. Place in freezer until firm, about 20 minutes. Bake, rotating halfway through, just until the tart base turns lightly golden brown, about 20 minutes. Remove pan and let tart base cool in pan.

In a mixing bowl, combine mascarpone (I like to use Vermont Creamery), lemon zest, lemon juice and sugar. Spread mixture on completely cooled tart base with a pastry spatula or butter knife. In another bowl, toss strawberries with honey, then arrange in whatever pattern you like on top of the tart. Slice, share and enjoy!


BOWLS OF CHERRIES


Yes, I pitted each and every single one of these cherries myself...with a knitting needle, in fact (the simple reason for which is that I do a lot more knitting then I do cherry pitting, so guess which pointy metal object is more readily available around my house?). It is, I believe, a thing that everyone should sit down and do at least once per cherry season. The rest of the year, you can pull your bag of frosty, pre-pitted cherries from the freezer like everyone else--totally admit to this habit myself--whenever you're in need of a homemade cherry pie, cherry syrup, muffins, an addition to a smoothie. 

But promise me this. 

Promise me that at least once a year, you'll sit down with a bowl of these beauties and work through the meditative act of poking each stone through the fruit by hand, one at a time. And as you pit each stubborn little devil, try to really think about the work itself. Think about how many deft fingertips had to pluck and pluck and pluck to fill this bowl full of juicy red fruits. Think about how many cherries had to first be carefully pitted to create each mouthful of cherry pie you've ever devoured, streaked with marbled scarlet-and-pink swirls of melting vanilla cream. Silently thank every cherry pie baker you've ever known, for their perseverance, for their deeply stained fingertips, for their dexterous way with a cherry pitter or a sharp knitting needle. 


And then do whatever you can to prolong cherry season, and to make the most of each single cherry you hand-pitted for someone's pleasure. If you're looking for suggestions, I'd suggest this recipe for pickled cherries. They're sweet, tart, with a faint background of salt, caramelly tones from brown sugar, nuanced notes of allspice, clove and pepper. These would be equally at home on a cheese plate, a kale salad spiked with goat cheese, or even a tender pulled pork sandwich.


Sweet & Tart Pickled Cherries

Makes about one quart

1 cup water
1/3 cup light brown sugar
1 tablespoon salt
1/2 teaspoon ground allspice
small handful of whole black peppercorns (around 20)
whole cloves (also about 20)
1/2 cup white vinegar
4 cups fresh sweet cherries, pitted

Place water, sugar, salt and spices in a small saucepan, heat just to boiling then remove from heat. Stir until sugar and salt are dissolved, let mixture steep for about five minutes. Add vinegar and cherries to mixture.

Let cool completely, then place in airtight container (note: leave whole spices in with the cherries & pickling brine, as they will continue to flavor the mixture. Just be careful to leave them behind when you remove the cherries for eating!) and refrigerate. Enjoy on everything from cheese plates to savory sandwiches within three weeks of pickling. Happy summer, cherry pitters!


GREEN GARLIC SOUP


Straight outta the farmer's market, yo. It's my new obsession: green garlic.


The return of spring, for me, always brings with it an obsession with bright green—the color hardest to come by in the dead of winter, which is when I’m always dreaming of tender shoots and leaves. Green garlic is always a welcome surprise at my farmer’s market, and when it begins to show up around springtime (it will stick around through early summer, too), I like to make this vibrant green-as-green-can-be soup to highlight the color & grassy flavor of the season. This particular soup gets its verdant hue from not only green garlic and zucchini, but also a hefty dose of fresh basil and parsley, as well.

It’s almost supernaturally creamy (considering it doesn’t have a drop of dairy in it), for two reasons: the mild taste & wonderfully smooth texture of pureed zucchini, and the magic that happens when soaked raw cashews are blended into a rich, very cream-like puree. This is the perfect soup to hit all those ‘luxury craving’ sensors in your brain without weighing you down with overindulgence, and it’s an ideal spring or early summer dinner meal.


Green Garlic & Zucchini Soup

Makes 4 servings

2 bunches green garlic (about 1/2 lb.)
2 tablespoons olive oil
3 large zucchini, unpeeled and diced into ½” pieces (abut 1 ½ lbs.)
1 quart chicken or vegetable stock
1/4 cup fresh chopped basil
¼ cup fresh chopped flat leaf parsley
1 cup raw cashews (covered in water and soaked for at least two hours)
½ cup water
Salt & pepper, to taste

For Parsley Oil:

1 bunch flat leaf parsley
1/2 cup olive oil

Slice green garlic (crosswise, across the bulb) into ¼” sections, including the darker green tops. Heat 2 tablespoons olive oil in a large, heavy-bottomed pot over medium high heat, add the white and pale green slices of garlic (save the darker green slices for the moment, you’ll add them later so they don’t burn) and cook for 5 minutes, stirring with a wooden spoon. Add zucchini and the sliced green tops of the garlic, continue to stir as you cook for 5 more minutes, allowing everything to soften. Add stock, basil and parsley, reduce heat slightly to medium low, cover and simmer for 30 minutes. While soup is simmering, make the creamy cashew puree and parsley oil.

Heat a pot of water to boiling, drop 1 whole bunch of parsley into it and blanch for 10 seconds. Remove quickly and shock with cold running water (or an ice bath) to stop cooking; parsley should be bright green and lovely. Dry well and place in blender with ½ cup olive oil, blend to a fine puree. Strain through cheesecloth or a fine mesh strainer, save the resulting bright green oil for garnishing.

Drain soaked cashews and rinse well. Place in food processor or high-powered blender, blend until creamy and smooth. After 30 minutes, add to pot and continue to blend the entire soup mixture (you can do this is batches in your blender, or an immersion ‘stick’ blender is great for this) until smooth. Taste soup, add salt & pepper to preference. Serve warm, garnished with a freeform swirl of parsley oil.